The Garden Investment Guide
Creating Outdoor Spaces That Add Lasting Value
Your Guide to Professional Garden Design & Construction

Ian Stone
RHS Gold Medal Winner
Director
George-Stone Gardens
Understanding Professional Garden Design
Since 2007, we've designed and delivered over 85 gardens across the Cotswolds, representing more than £3.2 million in client investment. We've learnt what separates exceptional outdoor spaces from expensive mistakes.
The secret? Seven insights that separate exceptional gardens from disappointing outcomes.
What Our Portfolio Taught Us
The pattern: Some gardens deliver value year after year. Others become expensive disappointments that require costly remediation.
The difference isn't budget. The difference is knowledge - knowing what actually matters in Cotswolds clay soil conditions. Knowing which shortcuts will cause problems. Knowing how to compare specifications, not just bottom-line prices.
This guide contains those lessons - the principles that separate gardens that enhance your property from ones where you're constantly problem-solving.
The Seven Principles of Exceptional Gardens
Engineering Before Aesthetics
Why beautiful sketches can hide expensive problems
Engineering Before Aesthetics
Why beautiful sketches can hide expensive problems
The seduction is always the same: A designer arrives with stunning visuals. Sweeping limestone terraces, statement features, mood lighting. You're sold before you reach page two.
What they don't show you: The structural calculations. The drainage sizing. The fall directions. The service load capacity.
What exceptional outdoor spaces have from day one
1. Proper structural design:
- • Setting-out plans with precise datum levels (not sketch dimensions)
- • Fall calculations showing exactly how water moves off surfaces (minimum 1:60 for patios in Cotswolds clay conditions)
- • Load-bearing analysis for structures (heavy features need real foundations)
2. Drainage engineering:
- • Best practise drainage throughout the garden for surface and grey water
- • Soakaway sizing based on actual rainfall data and soil infiltration rates
- • Channel drains positioned where water will flow
- • Land drains if clay is heavy
3. Service capacity planning:
- • Electrical load calculations for lighting, water features, and any powered elements
- • Water pressure requirements
- • Future capacity considerations
What to verify before signing anything
- Can I see example specifications from past projects? (Not just photos - actual technical documents)
- Does the paving design reference BS 7533? (Current standard for paving construction)
- Are fall calculations shown? (Minimum 1:60, steeper if site conditions demand it)
- How is the soakaway sized? (Demand to see calculations: Q=CIA formula, Met Office rainfall data, soil percolation test results)
If your designer can't produce these answers with specific numbers and referenced standards, you're not hiring a professional.

Foundation Engineering That Protects Your Investment
Why quality outdoor spaces deserve better than guesswork
Foundation Engineering That Protects Your Investment
Why quality outdoor spaces deserve better than guesswork
The reality: You're investing significant money in outdoor living spaces. This isn't a garden path - it's a significant asset that should last 20+ years.
What most designers miss: The Cotswolds sits on clay-heavy soil that moves. It swells when wet, shrinks when dry, and creates ground movement that standard specifications simply cannot handle long-term.
The real enemies of patios
- • Clay soil movement - Seasonal heave and shrinkage cycles causing settlement and cracking
- • Poor drainage - Water pooling undermines foundations and accelerates clay movement
- • Inadequate edge restraint - Lateral creep causes paving to spread and separate over years
- • Wrong sub-base choice - Unbound aggregate moves with clay; porcelain needs stability
- • Spot-bedding porcelain - Creates voids beneath slabs that crack under point loads
What protects your investment for 20+ years
1. Soil-specific foundation design:
For Cotswolds clay-loam (most common):
- • Minimum 150mm MOT Type 1 sub-base, compacted to 95% MDD in 75mm layers
- • Consider concrete sub-base for high-value areas - eliminates movement risk entirely
- • Geotextile membrane below sub-base and bi-axial mesh reinforcement (prevents clay migration into aggregate and adds additional load bearing capacity)
- • Adequate falls (1:60 minimum, 1:40 for clay) to move water away before it penetrates
For porcelain paving specifically:
- • Minimum 20mm porcelain thickness for outdoor use, use quality tiles with manufacturing tolerance of 1mm and rectified
2. Drainage that actually works:
This isn't cosmetic - it's structural. Water is what makes clay move. Control water, control movement.
- • Engineered falls calculated and verified during construction (not "we'll eyeball it")
- • Soakaway sized using Q=CIA formula for 1-in-30-year storm events (not guessed)
- • Soil infiltration testing to determine if land drains required (clay needs help draining)
- • Channel drains where appropriate
- • Permeable sub-base option where appropriate (allows water to drain through, not just off)
3. Edge restraint that prevents failure:
Paving wants to spread laterally over time. Edges are where failure starts.
- • Concrete haunching or ideally full footing on all patio edges
- • Deeper sub-base at edges if adjacent to soil (prevents undermining)
- • Proper compaction to perimeter (not just the middle 80%)
4. The bound vs unbound decision:
Unbound sub-base (traditional MOT Type 1):
Pros: Cost-effective, industry standard, adequate for most applications
Cons: Can settle over time with clay movement, requires perfect compaction
Best for: Natural stone paving, lower-value areas, when installed by experienced contractors
Bound sub-base (concrete slab):
Pros: Eliminates settlement risk, ideal for expensive features, superior long-term stability
Cons: Higher initial cost, less forgiving if falls aren't perfect from start
Best for: Porcelain paving, high-traffic zones, when budget allows protection of high-value investment
The cost reality
Standard specification
(adequate for many applications)
- • 100-150mm MOT Type 1
- • Spot-bedded pavers
- • Basic edge restraint
£85-110/m²
Lifespan: 10-15 years
Investment-grade
(protects expensive features)
- • 150-200mm MOT Type 1 with biaxial grid
- • Full mortar bed
- • Concrete haunching
- • Engineered drainage
£120-150/m²
Lifespan: 20+ years
Premium specification
(maximum protection)
- • Full concrete sub-base throughout
- • Drainage to CIRIA standards
£140-180/m²
Lifespan: 25+ years
Difference on 30m² patio: £1,050-£2,100 between standard and investment-grade
The question: Would you rather spend £1,500 extra now, or £8,000-£12,000 in 8-10 years lifting, repairing, and relaying failed paving?
Note: All costs are indicative, based on January 2025 Cotswolds market rates, and exclude VAT. Actual project costs depend on specification, site conditions, and market factors.
Real example - Harp Hill garden
Our clients needed a garden transformation. The site presented significant challenges: cut into a hillside, clay-heavy soil, drainage flowing toward the house.
What we specified:
- • Excavated several metres into the hillside to create space and assess true soil conditions
- • 150mm+ MOT Type 1 sub-base with enhanced compaction testing (site conditions demanded it)
- • Porcelain paving throughout on full mortar bed (no spot-bedding)
- • Proper falls engineered to move water away from house
- • Curved retaining wall with integrated seating area (engineered foundations for hillside loading)
- • Steps redesigned to run sideways up the wall (increased usable patio space)
- • Coloured render on walls (reduced maintenance requirements)
Challenges during construction:
- • Storm Ciara delivered heavy rainfall during excavation (we pumped out the area and diverted water flow with temporary piping - this proved our drainage design was critical)
- • Storm Dennis arrived the following weekend
- • First pandemic lockdown occurred during build (required careful materials planning with limited suppliers)
Result: A bright Mediterranean-style outdoor space that has now performed flawlessly for several years with zero settlement, zero cracking, zero drainage issues.
Your protection - the questions that expose amateurs
- "What are the soil conditions on my site and how does your specification address them?" (If they haven't assessed soil type, they're guessing)
- "Are you using biaxial grid reinforcement for the porcelain?" (Should be yes for clay soils)
- "Show me the sub-base specification - MOT Type 1 depth, compaction method, testing?" (Should see numbers: 150mm minimum, 95% MDD, layer-by-layer compaction)
- "How will the porcelain be bedded - spot or full?" (Correct answer: full mortar bed for porcelain)
- "What edge restraint prevents lateral movement?" (Should hear: concrete haunching, not vague "we'll secure it")
- "Have you considered concrete sub-base for key areas given the investment?" (Tests if they think about risk vs value)
- "How are the falls designed and how will you verify them during installation?" (Should see: calculated falls, checking during construction, not "we'll get it level")
The right contractor will be delighted you understand foundation engineering. The wrong contractor will try to move past these questions quickly.

Service Infrastructure Done Right
Because retrofitting is expensive
Service Infrastructure Done Right
Because retrofitting is expensive
The nightmare scenario
You complete your garden. Beautiful paving, mature planting, perfect layout. Then you realise you need:
This failure happens because designers think about aesthetics first, infrastructure as an afterthought.
What exceptional gardens have
Electrical infrastructure planned from day one:
Water infrastructure:
Cold water supply:
The cost reality
Service installation during construction
- • Trenches dug during groundworks phase (excavator already on site)
- • Cables/pipes laid before paving (no cutting through finished work)
- • Tested and certified before handover
£2,500-5,000
Service retrofitting after completion
- • Cut through finished paving (destroys sections that need replacing)
- • Hand-digging around finished work (slow, expensive labour)
- • Matching replacement pavers (often impossible — batch colours vary
£6,000-12,000
Your protection
Demand these documents before committing:
- Service layout plan (showing cable routes, socket locations)
- Installation methodology (when services go in relative to other work - answer should be "before hard landscaping")
Service infrastructure is invisible when done right. But its absence becomes very visible - and very expensive - when you need to retrofit.

Material Selection for Longevity
Beyond aesthetics to long-term performance
Material Selection for Longevity
Beyond aesthetics to long-term performance
The reality: Your Cotswolds garden faces freeze-thaw cycles, persistent damp, UV exposure, and years of footfall. Materials that look exceptional in a showroom may fail within three years outdoors. The difference between appropriate materials and poor choices isn't subtle—it's the difference between a garden that improves with age and one that requires expensive remedial work.
Material selection principles
Paving - stain resistance and durability:
-
•
Best: Porcelain (non-porous, stain-proof, pressure-wash clean)
-
•
Good: Granite (dense, minimal absorption, handles cleanup)
-
•
Acceptable: Dense limestone/sandstone (sealed properly, requires maintenance)
-
•
Poor: Soft sandstone, limestone (absorbs stains, marks permanently)
-
•
Worst: Concrete pavers (porous, stain easily, fade over time)
For wet conditions:
- • Anti-slip rating: R11 minimum (R10 acceptable for covered zones only)
- • Surface texture: Adequate grip when wet
- • Fast-drying properties: Porcelain dries fastest, smooth stone second, textured stone third
Structural materials:
For retaining walls and raised beds:
- • Natural stone (Cotswold stone from local quarries for authenticity)
- • Engineering brick (durable, handles moisture)
- • Rendered blockwork (cost-effective, requires good quality render)
For vertical features:
Timber: Use Accoya (acetylated, 50-year warranty) or oak (naturally durable)
Avoid: Pressure-treated softwood in visible locations (warps, splits, looks poor over time)
Material selection determines whether your garden looks exceptional in 5 years or requires expensive repairs. Choose for longevity, not just initial appearance.

Weatherproofing Your Investment
Because British weather is unpredictable
Weatherproofing Your Investment
Because British weather is unpredictable
Your reality in the Cotswolds: The UK climate means dealing with rain. Gardens that work year-round are engineered for wet weather, not just sunshine.
What makes the difference? Drainage, drainage, drainage.
What exceptional gardens have from day one
1. Engineered drainage strategy:
Surface water management:
- • Falls designed into paving: Minimum 1:60 (1.7% gradient), 1:40 if heavy clay
- • Fall directions mapped: Away from structures, toward drainage points
- • Channel drains at key locations where water concentrates
Soakaway system properly sized:
Calculated using Q=CIA formula:
- Q = flow rate
- C = runoff coefficient (0.9 for paving, 0.3 for planting)
- I = rainfall intensity (from Met Office data for location)
- A = catchment area
- • Sized for 1-in-30-year storm event
- • Positioned in area with adequate infiltration rate (tested, not assumed)
Below-ground infrastructure:
- • Permeable sub-base where appropriate (allows drainage through structure, not just off surface)
- • Land drains if clay is heavy (4" perforated pipe in gravel-filled trench, connecting to soakaway)
- • Geotextile membrane (separates soil from drainage layers, prevents clogging)
2. Covered zones (if appropriate):
Pergola considerations:
- • Minimum 3m height (avoids claustrophobic feeling)
- • Open on three sides (maintains outdoor feeling)
- • Guttering that actually works (oversized for intense downpours)
- • Downpipes routed to drainage (not just pouring onto patio edge)
The cost reality
Basic drainage
(inadequate)
- • Patio with falls
- • Single soakaway (undersized)
- • No channel drains
£800-1,500
Result: Puddles after rain, slow drying
Proper garden drainage
- • Engineered falls (calculated and verified)
- • Soakaway sized for 1-in-30-year storm
- • Channel drains where appropriate
- • Land drains if clay is heavy
£3,000-5,500
Result: Dry within 1 hour of rain stopping, no puddles
Drainage retrofit
(after paving laid)
- • Cut through finished paving
- • Install missing infrastructure
- • Re-pave (often can't match original batches)
£7,000-14,000
Result: Works properly, but expensive lesson and visible repairs
Your protection - drainage verification questions
- "Show me the drainage plan" (Should see: fall directions marked, drainage points indicated, soakaway location)
- "How is the soakaway sized?" (Should see actual calculation based on catchment area and rainfall intensity)
- "What's the soil infiltration rate?" (Should be tested, not assumed. Clay = slow, sandy = fast)
- "What anti-slip rating is the paving?" (Should be R11 minimum for outdoor use in UK climate)
- "How quickly will this dry after rain?" (If answer is vague, they haven't thought about it)
A garden that puddles after rain isn't finished properly. Drainage engineering is what separates spaces that work year-round from summer-only gardens.

Year-Round Usability
Extend your season from 5 months to 8-10 months
Year-Round Usability
Extend your season from 5 months to 8-10 months
The reality most discover
You spend significant money on an outdoor space. You use it May through September. That's 5 months per year.
October onwards: Too cold, too wet, too dark. The investment sits idle for 7 months.
What if you could use it April through November? That's 8 months. Some years, you might stretch it to March and December.
What makes the difference? Planning for British weather.
What year-round spaces have
1. Covered zones (where appropriate):
Pergola with canopy:
- • Minimum 3m height
- • Appropriate coverage for intended use
- • Open on three sides
- • Retractable or fixed canopy options
Costs:
- • Basic timber pergola (no canopy): £2,500-4,500
- • Timber pergola with retractable canopy: £5,500-9,000
- • Engineered aluminium with retractable roof: £8,000-15,000
2. Heating solutions (if required):
Infrared patio heaters:
- • Ceiling or wall-mounted
- • 2kW per unit (effective radius: 3-4m)
- • Cost: £400-800 per heater installed
Fire pit or fire table:
- • 10kW output (wood-burning) or gas-powered
- • 3-4m warming radius
- • Cost: £1,200-3,500 depending on specification
3. Lighting for darker months:
Warm white LEDs (2700-3000K):
- • Critical: Not cool white (4000K+) which feels clinical
- • Warm tones psychologically feel cosier
- • Dimmable circuits (different seasons need different brightness)
Layered lighting:
- • Task lighting where needed (functional)
- • Ambient lighting (atmosphere)
- • Feature lighting (drama)
- • Path lighting (practical)
Cost for proper year-round lighting: Enhanced lighting specification: £2,500-4,500
4. Weatherproof furniture considerations:
Weatherproof options:
- • All-weather wicker/rattan (resin-based, handles moisture)
- • Aluminium frames with outdoor-grade cushions
- • Teak or Accoya timber (naturally weather-resistant)
Adequate storage:
- • Waterproof cushion storage
- • Located conveniently
- • Sized appropriately
Costs:
- • Weatherproof storage bench/box: £300-800
- • Built-in storage: £600-1,500
Year-round usability transforms your garden from a summer-only feature into an outdoor living space that justifies its investment for 8-10 months per year.

Design for Maintenance Reality
Because every garden needs care
Design for Maintenance Reality
Because every garden needs care
The question nobody asks during design: "How do I maintain this?"
If your garden isn't designed for realistic maintenance, it becomes a burden.
What low-maintenance gardens have
1. Material choices designed for reality:
Paving:
-
•
Best: Porcelain (non-porous, stain-proof, pressure-wash clean)
-
•
Good: Granite (dense, minimal absorption)
-
•
Acceptable: Dense limestone/sandstone (sealed properly, requires maintenance)
Surfaces:
- • Non-porous materials reduce cleaning frequency
- • Textured surfaces hide minor marks better than smooth
2. Maintenance infrastructure:
Outdoor tap:
- • Essential for watering, cleaning, maintenance
- • Position strategically
- • Outdoor-rated with backflow prevention
Drainage:
- • Pressure washing generates runoff (needs drainage)
- • Adequate falls so water moves efficiently
Storage:
- • Tools and equipment need weatherproof storage
- • Located conveniently
3. Planting for realistic maintenance:
The mistake: High-maintenance specimens throughout. Look gorgeous initially. Become overwhelming.
What works:
Layered approach:
- • Structural evergreen foundation (year-round interest, low maintenance)
- • Seasonal interest plants in key zones (manageable quantities)
- • Ground cover in large areas (suppresses weeds, reduces maintenance)
Planting density:
- • Properly spaced (room to grow, reduces competition)
- • Mulched borders (suppresses weeds, retains moisture)
- • Right plant, right place (reduces failure and replacement)
4. Irrigation (where appropriate):
For new planting:
- • First 2 years critical for establishment
- • Consider irrigation system for large planted areas
- • Automatic timers reduce manual watering burden
Cost:
- • Basic irrigation for 50m² planting: £800-1,500
- • Automated system with zones: £2,000-4,000
A garden designed for realistic maintenance remains beautiful for decades. One that ignores maintenance reality becomes a burden within 2-3 years.
Real Client Success Stories
Boutique Hotel Commercial Space

The Challenge
The Cotswold Grange is a detached Victorian stone villa dating back to 1840, lovingly developed into an exquisite boutique hotel. With the interior completed, the client needed to completely transform the garden.
The Build
The installation needed to be achieved during winter and involved working with specialist substrates and adhesives for the porcelain, mosaic tiles and stone veneer, which all formed part of an intricate design.
To guarantee completion in good time, we erected a construction tent around the water feature to ensure an uninterrupted installation regardless of the winter weather and temperatures.
What We Built
- Contemporary porcelain paving (impermeable, ideal for commercial use)
- Custom water feature with mosaic detailing and integrated lighting
- Pleached trees for structure
- Fire pit for year-round use
- Carefully considered blend of classic and contemporary planting
- Professional-grade lighting system
Client Testimonial
"George-Stone helped us design a transformational landscape scheme for our rear garden which included an eye catching water feature and lighting. Andy and his hardy team battled through the winter months and delivered a high quality result on time. They are a good team to work with and I'm happy to recommend their services."
Nirav Sheth
Cotswold Grange Hotel
Director's Insight
"The winter frost and snow made for tough working conditions, especially for two of our colleagues who decided to tough it out in their shorts! Despite the bitter cold transforming this uninspiring, unused space into a garden that everyone can access and enjoy was incredibly satisfying."
Kirsty McGeorge
Director
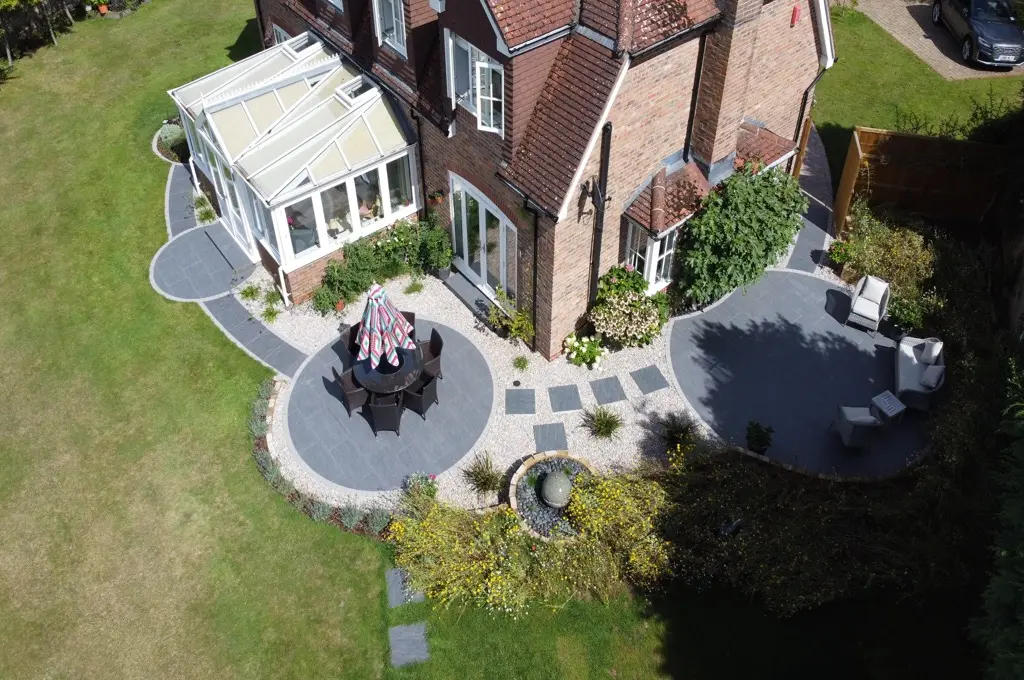
Countryside Garden

The Challenge
Our clients have a property in a brilliant location with superb views and had big plans for their modest sized garden. The challenge was making the best use of available space and light. After having a new extension built, they wanted two seating areas - one outside of the kitchen and one at the end of the garden for the sun in the evening.
The Build
One of the major tasks was creating a raised patio for the exit from the kitchen and the first seating area, which involved moving over 30 tonnes of raw material to raise the level up to the new door of the extension.
What We Built
Main Seating Area:
- Limestone patio with proper falls
- Retaining wall clad with Cotswold stone (sourced from local quarry in Guiting Power)
- Planting set into the patio
- Proper drainage infrastructure
Productive Side:
- Bin stores to conceal rubbish and recycling bins
- Two raised vegetable beds (easier planting, weeding, and harvesting)
- Generous path around vegetable beds
- Yew hedge for protection
- Modern log cabin (assembled by George-Stone team)
Garden Side:
- 2 patios, 3 types of seating, 5 flower beds, lighting, path and lawn
- Limestone steps leading into the garden
- Hand-made clay paver path curving through the space
- Final seating area perfect for evening sun
Client Testimonial
"Kirsty and her team did a fantastic job on re-landscaping our back garden. The quality of the dry-stone walling in particular is amazing and admired by everyone visiting. The team were extremely polite and personable and very hardworking. I am planning on using George-Stone again next year to tackle the front garden."
Ruth Harmsworth
Andoversford
Director's Insight
"This garden is one of our all time favourites and it's because of the feel, it's just really nice to be in. Practical material choice, finished to a very high standard, has resulted in well designed spaces that make this a practical and beautiful garden to spend time in."
Ian Stone
Director
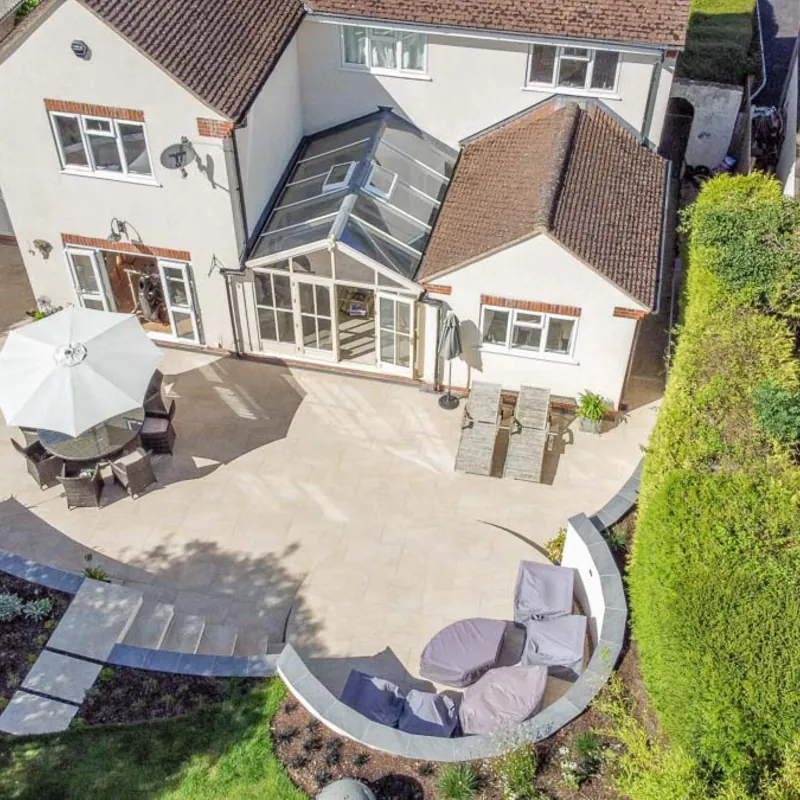
Multiple Seating Zones in Mature Garden
The Challenge
We were called to this property to help create an additional seating area to the side of the house which was set to lawn and not used at all. In the heat of summer it is much cooler on this side of the garden so they wanted to have a patio area that escapes the heat yet still enjoy being in the garden.
The Design
We created a fun and unique design that used circles in varying sizes all around the property to integrate the new seating area as well as refreshing the existing patio by the house. We used a large circle all around the building as an access path, including in the front garden to lead to the new gate installed for quick access to the side patio.
What We Built
- Excavated to enable flush level all the way around
- Sleepers set upright to follow curves and create space for water feature
- Anthracite grey porcelain paving (low maintenance and aesthetic properties)
- Lighter grey sett detail (cut to size on site)
- Polished black cobbles surrounding water feature
- Lights installed around building to highlight planting, water feature and patio areas
- Wildflower seeds behind sleepers
Director's Insight
"A harmonious garden with delights around each corner. With room for relaxation and unwinding….this is really special!"
Kirsty McGeorge
Director
Hillside Transformation

The Challenge
Harp Hill is a spectacular location with stunning views over Cheltenham. Houses built in this sought-after location all have to contend with the gradient. Our clients' main patio was already cut into the hill however the size and design of it did not provide the space they needed.
Construction Challenges
We had more than a few unforeseen events during this build:
- Storm Ciara delivered heavy rainfall during excavation (we pumped out the area and diverted excess water flow with temporary piping)
- Storm Dennis arrived the following weekend
- First pandemic lockdown occurred mid-build (only one local builders merchant open - required careful advance materials ordering)
What We Built
- Cutting back into the hill by several metres to open up the space
- Curved retaining wall with integrated seating area (catches evening sun)
- Steps redesigned to run sideways up the wall (greatly increasing patio usable space)
- Porcelain paving throughout including as coping stones for the wall (reduced maintenance)
- Coloured render on walls (no regular painting required)
- Extensive prairie style planting designed not to block the view
- Artisan water feature by Darren Rumley (polished concrete, integrated lighting)
The Result
Truly dramatic transformation - from a weathered and dark patio that did not have enough space, through epic mud and struggle during construction, a bright Mediterranean style sun trap emerged to create an amazing outdoor space.
Town Garden Haven

The Challenge
Our clients had recently had a new extension put onto their property and had been left by the builders with a huge step out of the new doors into a void. After looking around the rest of the garden we realised there was a lot of potential for improvement of the whole space so we recommended a complete garden design to really get the most out of the project.
What We Built
Side Seating Area
- Raised bed along back wall (ready for colourful planting, set off by historic brick wall)
- Terracotta paving with circular detail of black limestone setts
- Reinstated old water feature running into existing reservoir (sound drowns out traffic noises)
- Simple pergola with trellis creating corner feel
Extension Exit
- Composite deck linking side seating area and main path
- Limestone setts framing the lawn, flush with grass (easier mowing)
- Greek style terracotta urn water feature set on old millstone
The Result
"The sight of this garden on a sunny day is simply glorious. There is the sound of running water paired with colourful soft planting everywhere you look and it is quite simply a delight to spend time in."

What Our Clients Say
"Kirsty and her team carried out extensive, much needed work to our front and rear gardens including new patio, fencing, wall building etc. Matt, Arthur and Callum were cheerful, courteous and hard working and it was a pleasure seeing them every day. It was estimated that the work would take 5 – 6 weeks and they were spot on with completion."
Jim & Janet Attwooll
Gloucester
"A fabulous result brought about by a fabulous team! From the planning to the realisation of the final effect, Kirsty and her team were communicative and always willing to help. It was great to see a boring area of sloping grass transformed into a multi tiered garden complete with patio and fully planted. Many thanks."
Jeremy English
Cheltenham
Your Garden Investment Checklist
Before commissioning your garden project, verify these critical elements:
Site & Services Foundation
Drainage Engineering
- Soakaway sized using Q=CIA formula (not guessed)
- Sized for 1-in-30-year rainfall event
- Soil infiltration rate tested (not assumed)
- Channel drains specified where appropriate
- Falls designed minimum 1:60, steeper if clay is heavy
Hard Landscaping & Foundations
Patio Construction
- Sub-base depth 150-200mm (not standard 100mm for heavy clay)
- MOT Type 1 specified (angular aggregate, not rounded gravel)
- Compaction to 95% MDD in layers maximum 75mm each
- Concrete haunching on edges (prevents spreading and lifting)
- Falls maintained throughout at 1:60 minimum
Material Selection
- Paving anti-slip rating R11 minimum
- Porcelain or dense natural stone (not porous sandstone or concrete)
- Thickness: 20mm porcelain or 30mm natural stone minimum
- Full mortar bed specified (not spot-bedding)
Service Infrastructure
Power Infrastructure (if required)
- Electrical load calculation shows capacity for all planned elements
- Dedicated circuit from main consumer unit
- RCD protection specified (30mA trip)
- IP65-rated sockets minimum
- Armoured cable (SWA) buried 450mm depth
Water Supply (if required)
- Outdoor tap located conveniently
- 15mm copper minimum
- Stopcock accessible (winter isolation)
- Drainage considerations for any water features
Materials & Weatherproofing
Material Specifications
- Stain-resistant paving (porcelain/granite not porous stone)
- Anti-slip rating appropriate for UK climate
- Durable materials for structures (Accoya/oak for timber)
Weather Protection
- Drainage handles pressure-washing runoff
- Quick-drying surfaces specified
- Covered zones designed with proper drainage (if applicable)
Planting & Maintenance
Planting Considerations
- Structural evergreen foundation planned
- Appropriate spacing for mature size
- Right plant, right place selections
- Mulching strategy for weed suppression
Maintenance Infrastructure
- Outdoor tap conveniently located
- Adequate drainage for maintenance activities
- Storage for tools and equipment
- Access routes for maintenance

What To Do Next
Two ways to move forward with confidence
Book Your Free Pre-Project Consultation
Site Assessment
- Can your property support your vision? (We'll review site constraints, drainage capacity, access)
- Realistic budget for your requirements
- Layout optimisation for your specific site
Technical Guidance
- Service infrastructure requirements
- Material selection guidance
- Long-term performance expectations
Honest Recommendations
- We turn away projects that aren't right for us
- We'll tell you if another approach suits you better
- We'll identify any site constraints and solutions
No obligation. No pressure. Just honest technical guidance from people who've designed 85+ gardens and seen what works.
Email Us Your Biggest Garden Question
Not ready for a consultation? Have a specific question about your project?
Email us your challenge. We'll respond with specific, actionable guidance — even if you never become a client.
EMAIL YOUR QUESTION
George-Stone Gardens
Cotswolds garden design & build specialists
From Bourton-on-the-Water to Chipping Campden, Stow-on-the-Wold to Moreton-in-Marsh we create gardens that combine horticultural excellence with engineering precision across the Cotswolds.
Our Integrated Approach
Our designers work alongside landscapers from day one. Soft landscaping is planned before the first stone is laid. Drainage is considered during design conception. Construction realities inform every creative decision. One conversation replaces months of coordinating separate contractors.
Award-Winning Expertise
Tatton Park Flower Show 2024 for landscaping excellence
Laura (Principal Garden Designer) trained at the Royal Gardens at Highgrove
Hands-on experience in Cotswolds landscapes, clay soils, and microclimates
What Makes Our Gardens Different
Engineering-First Design
We calculate, specify, and document everything. Drainage is sized using CIRIA formulas. Loads are calculated. Foundations are designed for actual conditions. You see exactly what's specified and why.
Service Infrastructure Expertise
We've designed complete service systems for gardens ranging from simple patios to complex commercial installations. We understand load calculations, circuit sizing, and proper specifications.
Long-Term Thinking
We design for year-round usability where appropriate. We know what makes gardens work through all seasons.
Real-World Testing
We still visit gardens we designed 10+ years ago. We see which materials survive. We know which specifications still look perfect and which ones show wear. We learn from long-term reality, not just installation photos.
George-Stone Gardens
Engineering gardens that last.


Legal & Claims Substantiation
All claims based on company records and verifiable data (2008-2025)
Project volume and investment
85 completed gardens totalling £3.2M in client-paid project values (company financial records).
Client testimonials
All client testimonials quoted in this guide are genuine, documented, and used with written permission. Full names and locations provided where clients have given explicit consent. These testimonials reflect individual client experiences and outcomes may vary based on project scope, budget, site conditions, and client requirements.
Professional credentials
RHS Gold Medal awarded at Tatton Park Flower Show 2024 in Landscaping (verifiable through RHS public records). Laura (Principal Garden Designer) trained at the Royal Gardens at Highgrove, then under 5-time RHS Gold Medallist Robin Templar-Williams at Bristol Botanical Gardens. Insurance cover: £5M public liability and professional indemnity.
Cost and timeline examples
All costs presented are indicative examples based on January 2025 Cotswolds market rates and exclude VAT unless otherwise stated. Individual project costs and outcomes vary significantly based on site conditions, scope, materials selected, and unforeseen complications. These examples should not be taken as quotations or guarantees.
Technical calculations and specifications
All drainage calculations, electrical load calculations, and material specifications presented are based on current British Standards, manufacturer specifications, and industry best practises. Site-specific conditions may require adjustments. Professional assessment required for each individual project.
Case studies
All case studies are based on actual completed projects. Project outcomes reflect the specific circumstances, budgets, site conditions, and client requirements of each individual project. Results vary by project scope, site conditions, client requirements, and market factors. No guarantee is made that any specific outcome will be achieved.
Important Notice
Results vary by project scope, site conditions, client requirements, and market factors. No guarantee is made that any specific outcome will be achieved. This guide provides educational information and is not a substitute for professional site assessment and consultation.
The Garden Investment Guide ©2026 George-Stone Gardens
All Rights Reserved | Last updated: January 2026